My Affinity for Shino Glaze
After moving to New Hampshire in 2000, I took a ceramic course at the New Hampshire Art Institute (now part of the College of New Hampshire). There I found a group of potters who introduced me to Shino glaze.
Shino glazes were used by
Japan potters during the 16th century. They were known for their characteristic warm white finish, earthy tones, speckled surfaces, and subtle crawling
effects. Unfortunately, the recipe for the glazes faded away around
the late 17th century and became lost.
Through extensive
analysis of surviving Shino pottery scholars attempted to piece together
the lost recipe. In the 1930s and 1940s, two Japanese potters, Toyozo Arakawa
and Hajime Katō, developed the first modern Shino glaze by studying Momoyama
Shino pots.
Working independently in 1974, Virginia
Wirt, a
student of Warren MacKenzie at the University of Minnesota, developed a
glaze formula that emulated the characteristics of the Japanese Shino
glaze. Her glaze, which created a new category called American Shino, helped introduce Shino to a wider audience.
Once I discovered how the texture,
color and finish of Shino glazes are a product of its application and firing
process, I was hooked. Along with four other potters, I acquired a gas kiln for
the express purpose of firing Shino glazes and letting the “kiln paint the pot.”
Wood-fired or gas kilns are required to
fire Shino glazes. These kilns can be set to reduce the oxygen in the kiln so
that the molecular composition of the glaze is changed during the firing.
Given the serendipitous nature of the
glaze and firing, each Shino glazed pot is truly one-of-kind. The shape of the pot might be able to be produced
again, but the finished piece can never be duplicated.
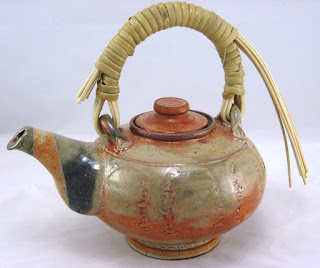
Below is a teapot in a private collection. It is a wonderful example of Carbon-Trapping Shino Glaze. The stripe on the spout of the teapot was created during the firing when carbon was present in the kiln at the exact moment the glaze was maturing and becoming the glassy coating of the finished piece.


Comments
Post a Comment