Posts

Firing Results-2-24-2013

Image
The snow stayed away long enough to finally fill and fire the kiln.  Over the three first weekends in February, New Hampshire was visited with snow storms during the first few weekends.  The kiln couldn't get loaded in the snow but on Saturday, February 24th, we received a reprieve from the snow gods and were able to load the kiln. My kiln partner, fired the kiln on Sunday, February 25th. Today, we unloaded the kiln. The picture on the left is the first lowest level of the kiln.  The teapots on this level have three different glazes applied.  The teapot on the far back of the shelf is covered with Tenmoku glaze.  The middle teapot is covered with Persimmon Blue and the front teapot and tea bowl are covered with a (new for me)Willie Helix green. The picture on the right shows the second level and portions of the lower level. The bottom left is filled with mugs that are covered in Persimmon Blue. The second level is all Carbon-Trapping Shino. The lef...

Re-purposed Buildings in San Antonio, Texas

Image
During a visit to San Antonio , I was blown away by the number of re-purposed older buildings the city has employed.  And I'm not writing about the re-purposing of the Alamo into a tourist destination. First site I became aware of was the Southwest School of the Arts. The school is located in the former Ursuline Convent and Girl’s Academy. The site has two campuses.  The first is in the refurbished buildings of the first school for girls in San Antonio and houses the ceramic and fibers studios (along with a small museum.)   The second campus is cattycorner on the other side of the street housing the contemporary exhibition galleries and its high-tech classrooms for photography, metals printmaking, digital imaging, paper and books.  This building us a re-purposed Sears and Roebuck automobile repair facility. This corner of Navarro St. and Augusta St must be the epicenter for re-purposed buildings in San Antonio . ...

Who named this winter storm after a cartoon fish?

Image
The reports are not final yet, but I'm sure we moved 30 inches of snow. This is what we woke to this morning after shoveling twice last night.  This picture is the back deck looking out to the pool.  Swim anyone?  If you can find the pool!  The dark horizontal object just over the railing is an 18" planter. This picture is the other deck.  The dogs needed to have a place to "do their business" so shoveling came before coffee!  Since we didn't get ANY snow last year, it seems the snow gods wanted to make up for lost precipitation quotas. That grey item is the deck table and chairs under a cover.  That gives one a great perception of the snow's depth. This will give everyone an idea of the depth of the snow when we began to shovel. The picture on the left is looking out to the road.  That is a car on the right side of the photo covered with the white stuff.  The picture on the left is at the clay studio door opened.  This doo...

Pop Up Camper Repair - Part 6 - Finished

Image
After creating this blog, I think I should have titled it, Pop Up Camper ROOF repair...as that is what I accomplished.  But now I have a list of mods and repairs I would like to get finished over the winter. The roof was put back on the camper and the lift arms (with new springs and cables) work great.  The roof "pops up"...imagine that!  Here is a picture of the folded camper. When I was putting the lift arms on, I noted that the particle board used in the body of the camper had deteriorated around the bolt and T-nut. I needed to put wood filler in the bolt holds and re-drill the holes.  I was surprised that the original design of these campers had the weight of the roof and the canvas at these four points without any other support.  I didn't have time to make any more repairs, so I took four corner supports (purchased at the local hardware store for a dollar or so) and bolted them to the body creating a "V" for the bolt to rest in.  I...

Pop Up Camper Repair - Part 5

Image
This weekend, I was able to put the roof back together again. It is still not attached to the camper as the new springs and cables still have to be installed on the lift arms.  That task is on the agenda for this week.  Here are some pictures. Once I put the running lights on and wired them up, my daughter and grandson (visiting) and my wife and I flipped it right side up.  I also will get some paint and hand paint the "Palomino" name.  Nearly done.

Pop Up Camper Repair - Part 4

Image
I had to wait a week for the new aluminum to arrive.  It did on Thursday.  I was able to cut both side wall pieces and get one side attached with construction adhesive this weekend. Once I built the box, I just couldn't put the old painted aluminum back on...but as you can see the bright white sides are going to stand out unless I can clean the aluminum on the top.  The clamps on the other side are holding the far side of aluminum. Once this side's adhesive is cured, the rebuild will be finished.  The next step will be to put it all back together, repair the lifting arms and reattach the roof to the camper.  Next weekend hopefully!

Pop Up Camper Repair - Part 3 - Roof Box Completed

Image
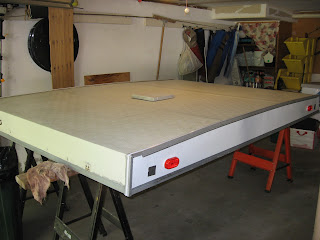
Lucky for me, although I didn't have much of the wood pieces to use as templates to make new front, back and sides, I did have the aluminum pieces that I could use.  Without these I would have been toast!  So I spent a few days cutting new wood, shaping, gluing and attaching these pieces to the roof.  See the results below. My plan was to use the old aluminum sides, but after finishing the box frame and holding these old, bruised, painted sides up to the new wood, it seemed just wrong.  So now I am on the hunt for aluminum sides.  This may take a few days to find and acquire.  I may not be doing much to the project for the next few days.